Booting
When a computer is started (it is booted), a flow of electrons “enters” in the computer circuitry and chips and, in few seconds, there is a prompt waiting for a command.
But… how is the very first instruction executed?
The overview…
This is a vey high level representation of the process
Some might argue that this representation is becoming outdated as there are new things like UEFI and systemd that replace some of the above steps. In any case, it is still in place in many systems. In the next paragraphs there is a description about the old and the new stuff!!
The details…
Lets continue with the (romantic?) view of electrons flowing and hitting some circuitry and the CPU. When the coming stream of electrons hits a specialized circuit, the circuit sends a signal (another stream of electrons :-) to the RESET pin of the CPU.
This RESET pin is a real (physical) pin found on CPUs.
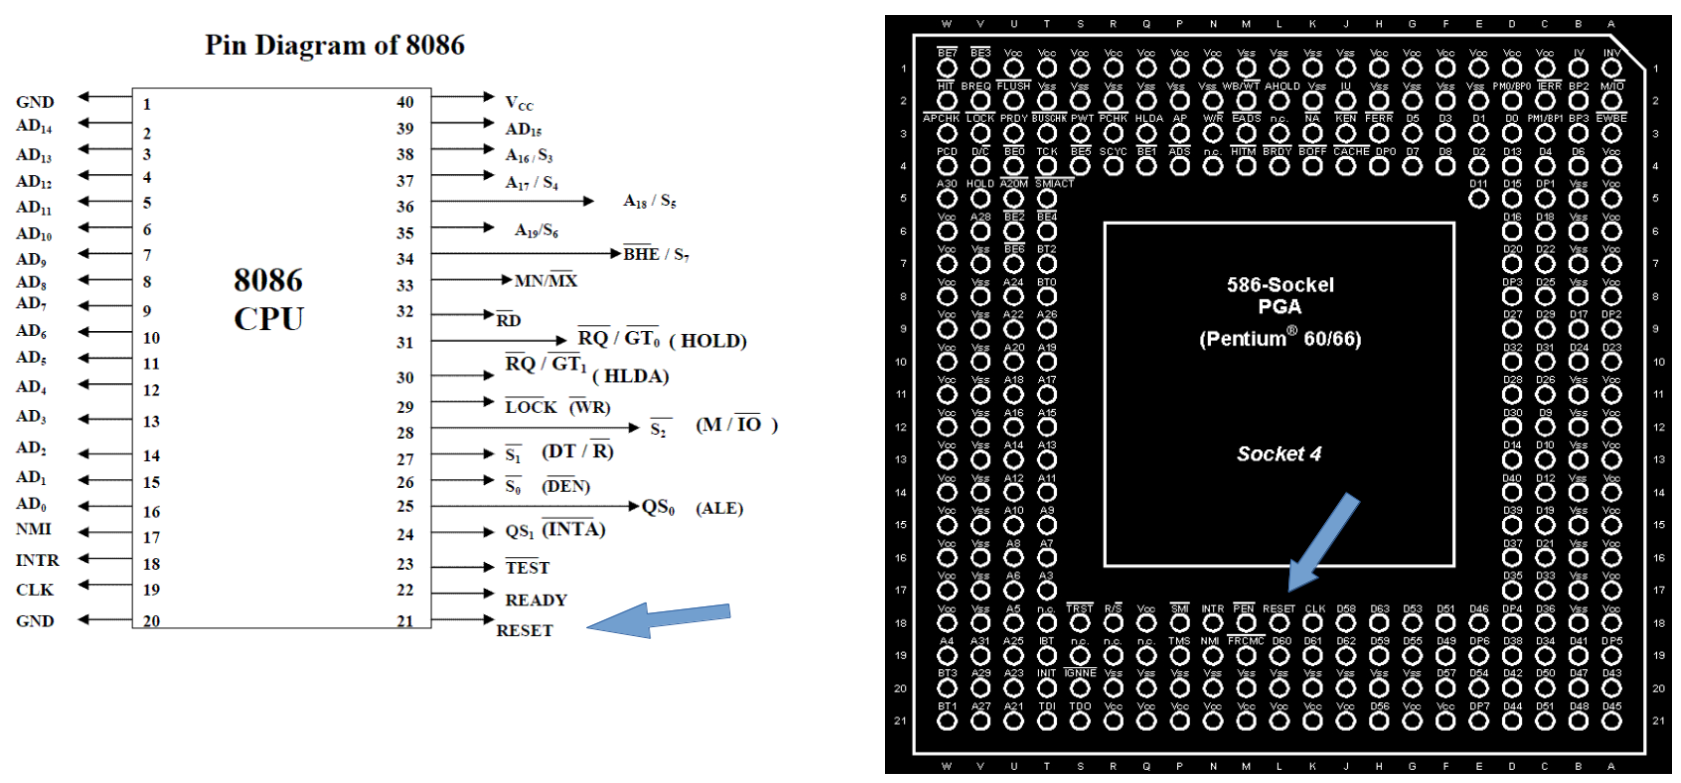
When the CPU gets this signal in the RESET pin, it will load the very first instruction at memory address FFFF0h (or address FFFFFFF0h in 32⁄64 bit architectures). These addresses are also called Reset Vector (more about this below)
Find here a more detailed explanation about the Reset Vector. Find here the Memory Map of the IA32 PC architecture by Intel.
Boot and BIOS
The very first instructions and follow-up actions are part of the routines and programs that conform what was named Basic Input Ouput System (B.I.O.S) for old computers (in IT, “old” means very few years), or Unified Extensible Firmware Interface (UEFI) for newly systems. For simplicity, BIOS and UEFI will be used indistinguishably unless otherwise stated. Find deeper explanations about BIOS and UEFI
First PCs already used Read Only Memory (ROM) chips to store the BIOS programs. Due to the underlying hardware’s design, a small part of the ROM is directly mapped to the memory address space. This memory address is FFFF0h (or address FFFFFFF0h in 32 bit architectures), whiich we called before “REset Vector”. As you can imagine, this address contains the first instruction of the first routines to execute. See the Boot sequence description at Wikipedia.
You can find this very first instruction close to the bottom here. As you can see, it is an assembler instruction that does a (far) jump where some BIOS routines (known as POST) have the first instruction. “far jmp” is an instruction of Assembler, a language that is a pseudo representation of the real machine code run by the CPUs. Go deeper about this with the assembler and machine code posts at Wikipedia. (yes… what a wonderful place is Wikipedia. I am not related to it at all but, probably like you, I am a heavy user of it. If you are aalso a heavy user, please, do your best to support it via collaborating, donating or just spreading the word !!)
UEFI has a different booting process.
POST
The CPU is already executing the first instructions of the BIOS routines. These initial routines are part of what is called the Power On Self Test (POST). Remember that this very initial code is executed from a memory address mapped to the ROM, which is slow.
These first steps of POST do checks for the initial needed hardware (mainly memory) and will load the rest of the BIOS routines in that memory..
Read this answer at Stackoverflow (and its comments) for a much better and deeper explanation.
When all the checks are done, POST calls the BIOS interrupt 13 INT-13 to load and pass control to the sectors of the disk containing programs to load the kernel, known as boot loader, or even second stage boot loaders, as POST is the very first loader !!
This is true for all PC-Intel computer, but UEFI, while maintaining compatibility with this “BIOS” mode, has a more modular and modern design.
You can find more information about POST at Wikipedia.
Linux Boot loader
After the POST routines, the next stage is to load the Operating System (in our case Linux).
New BIOS routines are executed, which look at some definitions stored in permanent RAM device, called CMOS (Complementary Metal Oxide *S**emiconductor).
CMOS data is kept by the battery all motherboards have. Part of this data holds a list of the bootable devices (you can see this list when you enter into the Bios). This (ordered) list is fetched by the BIOS routines and used to scan the listed devices. Although there can be other devices (CD-ROMs, USBs, etc.), lets assume that our primary Hard Drive is the first one.
The first sector of cylinder 0 of head 0 (in other words, the very first sector of a partitioned and formated hard disk) contains the MBR (Master Boot Sector) which in turn contains the initial boot loader and some extra info about the structure of the partition table on that hard disk. All this in 512 Kb. To be precise, the MBR is 446 bytes. The rest up to 512 are 4 patition entries of 16 bytes, plus 2 lst bytes for the boot signature (active partition). See them at the disc sector layout at Wikipedia.
One (and only one) of the partitions (up to a maximum of 4) has to be marked as active in order to load its (second stage) loader. This second loader can also be seen as the real kernel (or OS nucleus) loader. In Windows, it can be, NTLDR (Windows NT Loader) or its successor.
In Linux, the most populars are LILO and GRUB. The major part of Linux distributions are using (nowadays) GRUB2.
GRUB2
When GNU GRUB2 (GRand U nified Bootloader version 2) is installed in the disk (normally when installing a Linux distribution), the file boot.img is copied in the MBR sector. When loaded into memory and run (remember that this is done by the BIOS routines…) it calls the first sector of the file core.img. This is the 1.5 stage (yes, GRUB has 3 stages). When core.img runs, it loads its configuration, needed modules and file system drivers. It also knows about where stage 2 files are in the file system. Stage 1.5 knows its configurations as it is created from diskboot.img and configured during installation time.
As stage 1.5 has loaded filesystem driveers, the 2nd stage is loaded from a file system and not from “raw” sectors in the disk (more precisely, from the standard directory /boot/grub) . This allows to have enough capacity to store bigger files with more complex and larger routines, configuration files, etc.
After loading all needed files into memory, stage 2 presents a text selection in the console screen, allowing to select the OS (Operating System) to load. Once a kernel has been selected by the user or by configuration during installation, GRUB stage 2 reads and loads the kernel code from the file system. GRUB also loads the initrd (Initial RAM disk) image.
When GRUB has loaded the kernel and initrd images, it pases control to the kernel.
You can find here the code for grub_main function. This function prepares many things (console, root device, etc.) and passes control to grub_normal_execute. After some calls and many checks, grub_command_execute is called to execute the grub boot command.
Here you can find images (files) that GRUB can load (normally boot.img and diskboot.img).
Find unix.stackexchange.com a very good response to a question about loading initrd.
Find in the Linux documentation the boot protocols.
The Kernel
When the kernel is given control by GRUB stage 2, it does many things. As the loaded kernel is normally a compressed image (zIamge or bzImage), it decompresses itself into memory. It also does many initializations like setting up interrupts, load the initial RAM disk so the kernel can find useful commands, starts the scheduler etc. At some point, the kernel mounts the root file system. At the end, the kernel calls the init function, which is the first real ‘user space’ process.
The call to init is hard coded in the kernel. Check the kernel source code from Linus Torvals repository. Look at the end of function kernel_init to find where init is expected to be. (Same for kernel version 4.16 at elixir.bootlin.com) as the Linus repository keeps updated and line pointers vary with time.
Init (or systemd)
While init has been recently superseded by systemd in many Linus distros, both have the same mission. /sbin/init is the program in charge to start all that is needed to make the computer useful from a user or service point of view.
With still some controversy, many people claim that systemd is a more modern, flexible and faster way to start things up (at least for the desktop/laptop arena…), but many others (Mico Maco included) think that it is way to complicated (breaking the Unix ‘keep things small and simple’ principle ), and it creates dangerous coupling among different subsystems. Time will tell…
For compatibility sake, if systemd is used in a system, /sbin/init is a link that points to the systemd binary. This way the kernel keeps calling something called init (as previously shown). You can check this running ps -ef | less in a terminal and check the very first process ID (PID 1) is init.
mycomputer ~ # ps -ef | less
UID        PID  PPID  C STIME TTY          TIME CMD
root         1     0  0 18:23 ?        00:00:01 /sbin/init splash
..........
Note that the parent process ID (PPID) of init is “0”. This process with PID “0” is the kernel itself (you might find people talking about swapper, scheduler, idle task, etc..) In any case, it is part of the kernel and therefore in kernel space so it does not show up in ps
We will not go much further from here. init/systemd tasks might vary a lot, depending on linux flavor, hardware, needed processes, etc.
One of the program (services?, daemons?) init runs is the XWindows environment to present the graphical environment.
init also launches the program/daemon that takes care of the pseudo-terminals. This program used to be agetty (o a similar tty program).
The agetty program (/sbin/agetty), in combination with login (/bin/login), is in charge, after the user enters the username and password, to do several tasks like credential and security checks, initializes the environment, etc. It will also launch a shell, normally bash (/bin/bash), which also does some more environment setup and presents a prompt to the user.
As one can imagine, all the actions done by these programs take default hard coded values or values from several configuration files that the user can edit and tailor.
As previously commented, nowadays many distributions have changed initd by systemd. While systemd is a world on its own, the concept regarding login is the same. As you can find in file
/etc/systemd/system/getty.target.wants/getty@tty1.service
(which in turn is a link to /lib/systemd/system/getty@.service), there are login configuration parameters managed by systemd. One of these parameters informs the service for managing “tty” terminals:
[Service]
# the VT is cleared by TTYVTDisallocate
ExecStart=-/sbin/agetty --noclear %I $TERM
Not surprisingly, it calls our old friend agetty !!
So the general concept still holds true with systemd:
The above description for getting a login prompt and stating a bash session applies to what is known as an “interactive session”, where users can “interact” with the system. Nevertheless, there are also “non interactive sessions” or launch of programs that are not a shell. They are normally called daemons and configure many things in the system, like the printing daemon (normally cups), the bluetooth daemon or an HTTP server like apache or nginx.
Discover the, for many of us, new world and (too) many functionalities of systemd here or here.. or here
You can even look to the code of systemd at the GIT repository of one of its creators !!
Mico Maco has kept his pending links to read about systemd here
OK, and now what?
In this page Mico Maco has tried to provide a description about what happens “internally” when a computer is powered-on an shows a prompt to accept commands by the user.
As you might already have spotted, this process implies the launch of many processes while initializing the system. Also, many of these processes keep running “in the background” to, for instance, accept HTTP requests in case the system is setup to run a web server. In turn, that HTTP server will need to run some code to serve the page, which in turn can be interpreted by a specific language interpreter like PHP or Java.
So there are many things running in the background while we also have our shell prompt waiting for a command…
So how all this is being handled? How all seems to run “in parallel” at the same time?
Mico Maco recommends to follow with how bash executes commands, which is a more interactive or practical view.
This will lead, in any case, to the real McCoy about running multiple processes and scheduling them.
Other resources ans references
If you are interested on a travel in time and also in digging deeper on physical switches, magnetic drums and how the ROM revolutionized all, read this very interesting post at Wikipedia.
Find a much deeper Linux booting explanation by 0xax at section “From the bootloader to the kernel””
An introduction to the Linux boot and startup processes link
Inside the Linux boot process at IBM (old but clear !!). Newer article at IBM Learn Linux, 101: Boot the system